Saturday, April 14, 2012

Miniature Saarinen Tulip Table How To Tutorial

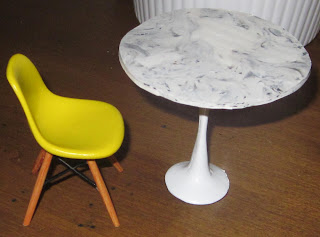
The Tulip table is complete.  It is wonky, but it is complete.  I am creating another original model with hopefully smoother edges.  If you're interested in the process, it is detailed below:

Materials:
A fresh-out-of-the-oven batch of marble table tops
  • Sculpey clay for the original
  • wet/dry sandpaper
  • Smooth-On Oomoo 30 Silicon Mold Making rubber
  • Legos
  • rubber bands
  • vaseline
  • non-sulphur clay (I used Plasticina)
  • Straw
  • Smooth-Cast 325 plastic
  • Plastic spray paint
  • Sculpey clay in white, black, transluscent and pewter for "marble" top
  • Pasta machine
Giving the bases, and a toilet, a spray of paint
The hardest part is the model.  All I can suggest is either an art degree with a major in sculpture, or the patience of a saint and tons of sanding.  Once the original is complete, make a mold box (I use Legos), and fill the box to about halfway with non-sulphur clay (sulphur will eat away at your original).  Push the model into the clay and make a pour hole at the bottom with a straw.  Make registration keys with a small, round object.  Pour the rubber slowly over the model until covered.  Allow to dry and remove clay.  Cover the top of the rubber mold half with vaseline and allow to dry, then pour in rubber on other side.  When your mold is done, rubber band it together and pour in the plastic.  Demold and remove the flashing.  I didn't use plastic coloring, so I had to spray paint the finished product.

For the top, I mix together mostly white, with tiny bits of black, transluscent and pewter.  Roll together until the streaking is the way you like it.  Then, put it through a pasta machine and cut out a 3 inch diameter circle.  Bake, and glue the top to your base.  Hopefully someday I will come up with a video on the step-by-step. 

And here is the finished product with a Reac shell chair!

0 comments:

Post a Comment


The Hard Way Copyright © 2012 Design by Ipietoon Blogger Template

Blogging tips