 |
| This turned out better than I had hoped. |
Next, I'll try my hand at the goodie bags (which don't need to be filled, because, hello? piñata!). Then, I'll need a week off to construct the cake, cook the food, and clean the house so that kids can come in and trash it (See? There's that metaphor again.) I'm planning on NOT involving my husband in any aspect, since five birthday parties past have taught me it is easier to do everything myself than dare ask him to spearhead anything, including cleaning up the pee from the rim of the toilet. That really can only come from him, right? No, I'll just have to do it. Much easier.
So, for the instructions on how to make this:
Materials:
- One large ball
- newspapers, cut into strips
- flour and water in 1:2 ratio
- cardboard
- Xacto knife
- white paper
- crepe paper
- Elmer's glue
- hot glue
- hole punch
- fabric, ribbon or tulle for the bow
- black and yellow construction paper
- Make a mixture of 1 part flour to two parts water, heat in mic
rowave for 20-30 seconds. Stir to an even consistency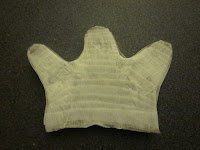
The completed crown - Take your newspaper strips, cover in flour paste, and cover the ball. Cover the ball with three layers, allowing the paste to dry completely in between the layers.
- Meanwhile, cut a pattern for the ears and crown. You'll need four copies of the ears and two for the crown. Cut from cardboard. Then, cut strips of cardboard around 1" thick. With an Xacto knife, score around 1/8" along both edges of the cardboard strips and fold over. Along the folded edge, cut V-shaped notches so that the strips will bend.
- Hot glue the strips of cardboard along the edges of the ears and crown. Cover with either crepe paper, or tissue paper. Cover the edges with strips of plain white paper.

The width of the
ears and crown look
better with a strip of
paper covering the
crepe paper - When the papier mache is completely dry, cut a hole with a knife. Remove the deflated ball. This will be the top of the piñata.
- Cover the ball with crepe paper using the Elmer's glue. I cut my crepe paper by cutting through many layers with scissors while it was stilled rolled. Then, spin the ball rather than spinning the crepe paper, which will get twisted.
- Punch holes around 1" from the opening at the top and attach a ribbon for hanging.
- Meanwhile, fashion a bow for her head. I used large floral ribbon that I folded like an accordian, and stapled in the middle. Then, I rolled a section of matching ribbon and tied this around the stapled middle.
- Hot glue the ears and crown on.
- Cut out black eyes and whiskers, and a yellow nose. I put glued faces on both sides of the
piñata.

 |
| Kitty's bow made from large floral ribbon, secured with a "knot" of the same rolled ribbon |

Fill the bugger with candy, plastic junk, or slime. Your choice! Give the kids a baseball bat and teach them the glory and beauty of violence and destruction. Have fun!


it's so cute! but like you said it will be destroyed in a matter of min. oh well at least Tootie Pie will have a wonderful party
ReplyDeleteHugs
Marisa :)
Best of luck with the party planning! You're off to a great start! :D
ReplyDelete