Saturday, March 16, 2013

A Wee Bit O'Green - Making Mini Topiaries

1 comments
The new, yet unfinished, topiaries, in their
rightful place.
I am working on making little topiaries for the entrance.  I have to figure out how to make miniature dirt, but their are mostly finished.  I couldn't wait to put them out front, and I love the view through the windows!  It's like I'm spying on mini people.  I adore the view of things through windows.  It's like you only look straight across or up, and most of the distracting crap in a home is hovering lower, so all houses look great peering in through a window.

I still have to fix the corner of the front door.  I tried putting some wood putty on it, and attempted sanding it, but it's in such a tight space.  This is the part I don't like: big fixer-upper jobs.  I much prefer fiddly little things. 

My panel is more yellowed
and, sadly, browned.
I am also trying to create new windows since the casting of the one original window IS JUST NOT WORKING!!  I have tried around five different mold, only one of which I got to the actual casting phase.  That one I didn't see the point of mold release (or mildew remover, as the woman at the craft store called it).  Now I understand why.  These molds are killing me.  So I am trying a new approach using salvaged commercial ceiling light panels.  I'm pretty much betting they'll look horrible. 

Tuesday, March 12, 2013

In What Other Jobs are Professionals Evaluated Like This?

2 comments
The purported aim of this blog, at least originally, was to talk about ideas to actually improve education today.  It has since morphed into a whole new territory, but that's okay.  Today's post is in the vein of the original goal: improving education.  But, I'd like to focus less on what will improve it (you can click on the "teaching" topic in the "Posts by Topic" column to the left if you're interested in some of my ideas), and instead examine the INSANITY that is being legislated in an effort to "reform" schools.

I have a friend who is also a teacher, and she, too, has worked other jobs, and she asked me, "in what other job do supervisors evaluate you as you're doing your work?".  And it's a valid question.  Most everyone in office work has some sort of yearly evaluation, but I cannot think of one job where a superior comes to your desk or client meeting or conference presentation and pulls out a clipboard to perform an assessment of your skills.  Can you?   Do they question the client about why you are pitching the sale that way?  Or ask at the meeting why you are seated where you are?  Seriously? Because I need to know.

Well, in any case, this sort of evaluation has been in place for teachers since quite some time, but it is only recently that the powers that be have decided that this humiliating and undermining system be reworked into something humiliating, undermining and as convoluted as only a government committee could make it.  Or, a committee taking government money.  Introducing: The Danielson Framework!

This piece of rubbish "is divided into 22 components (and 76 smaller elements) clustered into four domains of teaching responsibility" that teachers are supposed to work into their forty-five minute lessons (at the rate of 2 per minute, one would assume).  Excuse me while I vomit on that bullshit quote from "The Danielson Group" above. 

This picture does not resemble my classroom in
so many ways: engaged, smiling children; working
cooperatively; technology from this century that is
not coated in gum, grafitti and retains all of its keys;
bright, clean surroundings; bright, clean kids...
I could go on. 
Okay, I have a wretched taste in my mouth, but I'm back.  This sort of garbage is where all our education money is going: to douchebags that put together gag-worthy documents and hire people to put pictures of happy, diverse children and educators collaborating in new, clean environments with cutting edge, functional technology all over their literature.  In other words, they haven't a clue about a real classroom.  I will not bore you with all the arcane details, but some things are just glaring problems with this "framework" and it doesn't take a rocket scientist to figure it out.  I will introduce to you one of the, uh, domains or subcomponents or whatever new lingo their copywriter came up with, of this overwrought behemoth:

Competency 3b - Using Questioning and Discussion Techniques

Developing:
The teacher frames some questions designed to promote student thinking, but only a few students are involved.
The teacher invites students to resond directly to one another's ideas, but few students respond.
The teacher calls on many students, but only a small number actually participate in the discussion.

Effective:
Discussions enable students to talk to one another, without ongoing mediation by the teacher.
Many students actively engage in the discussion.

Highly Effective:
Students initiate higher-order questions.
Students extend the discussion, enriching it.
Students invite comments from their classmates during a discussion.

From this small outtake, who can tell me the difference between a "developing" teacher and a "highly effective" teacher?  If you said "the students" you are correct!  So, a low-rated teacher will do all the right things, but the students will not be involved, respond or participate.  And that is the framework on which we are hanging all of our educational hopes on and spending all of our educational budget.  Yes, the teachers will be punished, with threat of losing their jobs, if the students don't engage in their own learning.  Believe me, if anyone would love for students to "initiate higher-order questions" or "extend the discussion", it would be teachers.  And a teacher with highly motivated students will simply sit back and the students will teach themselves!  How wonderful.  How utterly stupid.   

Sunday, March 10, 2013

Wine Bottle Tutorial

3 comments
Bottle on the left is made from an eye dropper,
cut to size.
Bottle on the right is from a mechanical pencil
tip.
I finally figured out the puzzle of the wine bottle.  Ever since I envisioned a February scene for Mini*Asthetics challenge, I have been wracking my brain trying to work this mini out.  I tried melting a pen casing over a flame, but I never quite perfected that.  I ended up with warped plastic.  It is hard to pull on something exactly evenly, I guess.  I have a Christmas light waiting in the wings, but then an eye dropper caught my eye in the science lab, and Bammo!  I was in business. 

Materials:
  • eye dropper or mechanical pencil top
  • sand paper
  • paint
  • tin foil
  • an image of a wine label and a printer
  • hole punch
  • milk jug

Procedure:
  • So, just trim the eye dropper to a proportionally pleasing height, then sand it smooth.  If you're using a pencil end bit, you don't even need to trim!
  • Punch a hole from the milk jug with the hole punch.  The makers of eye droppers must have gotten together with the engineers creating hole punches, because the size is identical. 
  • Paint the inside of the dropper and one side of the hole punch bottle green.  I imagine that glass paint would give the best results, but, since I only have white glass paint, I just mixed green and yellow craft paint. 
  • Size your wine label and print and glue it to the bottle. 
  • Top the bottle with a bit of tin foil cut to size.  I might replace this with a bit of the foil wrappers from an actual bottle of wine when I buy and open my next bottle.  I'm currently in the middle of a box of wine.  Yes, I am a Francophile AND I drink wine from a box.  I am a paradox, I tell ya.

Modify this tutorial as you like and let me know how yours came out.  Enjoy!

Sculptures on a Stick - Some Mini Art I Wanted to Make

1 comments
My forte seems to be in the
teeniest of tiny.  Clockwise
from upper right: magazine
folder, Grease CD, a new
copy of Charlotte's Web, and
a gingerbread house.
You may have noticed that some of the larger, more dull items on the Undersized Urbanite to-do list have been languishing.  I could strike out number 13, "Make working lamps", but, sorry, Tootie Pie, the hanging flashlights are not up to even my low standards, and the Arco lamp?  Well, I still haven't fixed that.  Those bigger jobs, although they would make my house look 100% better (moulding around the door openings), just don't jazz me up, ya know?  I prefer making small small things.  I guess number 12, the highly specific "Accessorize, accessorize, accessorize", can be safely struck from that to-do list.

Beads on a stick
My "styled" shelves in their
rightful place
So, the very, very small things that I have been working on and completed (because working on something can take an exceedingly long time, and certain things may never be completed) include my new mini sculptures-on-a-stick.  Like most items in my dollhouse (are we mini modernists even calling them that?), this item is something I've craved for my own home since I saw it somewhere years ago.  Of course, I cannot find the inspiration photo, but the originals were cooler than my "interpretations".  My art is simply square beads, paperclips and round beads, painted to match.  Big whoop, right?

Eye dropper gives the right
shape
I have also become somewhat obsessed with creating a miniature wine bottle.  I originally needed wine for my February holiday themed room for Mini*Asthetics challenge.  But, since I couldn't come up with how to make them, I just used two pink bottles that came from my grab bag of free Barbie stuff.  After reading what I imagine is ALL the tutorials online - using Christmas lights, pen casings over a flame, and, well, that's basically it - I hit upon my inspiration during a coverage in the science lab: droppers.  I cut the end off a dropper, painted it green inside, and glued some paper on.  Now I can say my dollhouse is complete!

Thursday, March 7, 2013

Winter Dreams - Spring and Summer Projects

1 comments
¡Adios, Febrero!  I have documented my distaste for this month, and this year it was heightened because our Mid-Winter break was abbreviated, due to SuperStorm Sandy.  But, I am dreaming of warmer months, and fresh air, and two months off.  There is always a long list of projects to be completed during the summer.  Many have to do with salvaging junk, like my basement coffee table, or much more mundane things like organizing the garage.  The scene that occurs down there during the winter is cray-cray. 

I... uh... drove past my own house.
Our home's facade was never one to brag about.  I live in an attached rowhouse that looks exactly like everyone else's on the block.  So much so that when my neighbors redid their driveway, which is shared (non-city folk, I know you have no idea what a shared drive looks like, so here's a photo), I drove right past my own home, and had to turn around in another neighbor's drive.  "I drove past my house", I sheepishly told them as they stared at me like I was nuts.  I felt like Oda Mae in Ghost: "I'm sorry, but, could I get another one? I... uh... signed the wrong name."  In any case, the lintel over the garage was a known issue when we bought the house.  Four years later, and we had moss growing there.  I like moss, so I left it.  But, do you know who else likes moss?  Squirrels do.  Or, maybe they buried their nuts there last fall, come to think of it, there was an oak sapling growing there last year, but in any case, the lintel now looks like this:
So, fixing lintel is on the "must be done" list.  Then, I'd like to cover my chain link fencing in the back with white lattice panels.  I took a very dreary picture of my backyard, so that the after, if it ever happens, will look that much snazzier.  Yes, those are forks in the garden.  They're to keep the cats from using it as a litter box.

It was drizzling, hence the white dots on lens.
A rake would certainly spruce this space up!

Ah, summer.  It cannot come fast enough!  

Monday, March 4, 2013

Arne Jacobsen Egg Chair Miniature Tutorial

5 comments
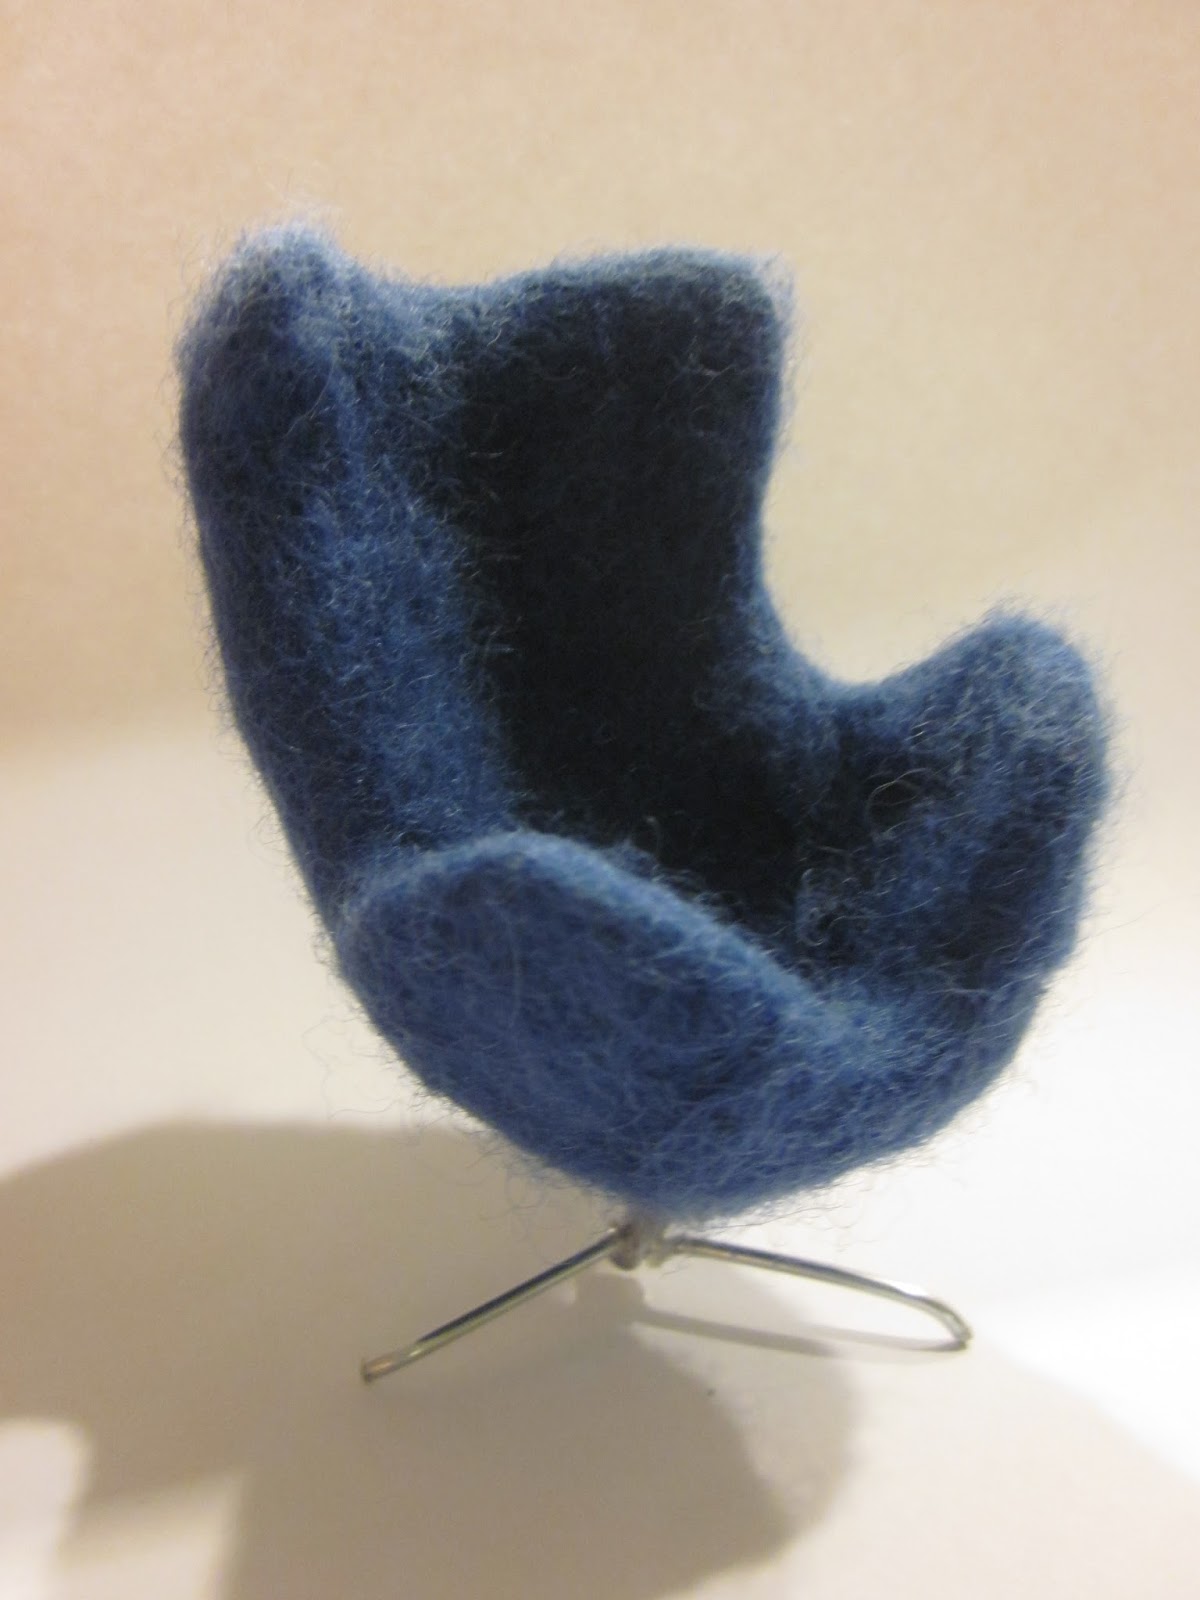
This tutorial was a long time coming. It occured to me one day, what better way to make an egg chair, than with an egg? So, this chair was inspired by the classic plastic Easter egg. It then stalled when I unsuccessfully tried out many different ways to cover the odd shape, and finally settled on a felted wool covering.

Materials:
Plastic Easter egg
Polymer clay
Knife
Egg chair pattern or really good eye
Super glue (for the inevitable breaking of chair when removing from egg) Wool roving
Dish detergent
Plastic Ziploc bag
Plastic lollipop stick
Pin
Large paper clip
Wire cutters
Small pliers

Procedure:
  •  Find a larger sized plastic easter egg and a pattern for the egg chair.  I found some images online of the classic chair's profile, and used that on both sides.
  • Send polymer clay through a pasta machine or roll by hand.  Cover easter egg with a layer of clay.  It may be helpful to first glue the egg together, as it will come apart easily if you don't.
  • Trace around your pattern in the clay.  Make an indentation at the bottom for the chair leg support.
  • Boil the egg with the polymer clay.  Don't worry, it won't melt the plastic.
  • Using oven mitts, peel the still pliable but very hot clay from the plastic egg.  If it breaks, use the super glue to mend.  The wool coat will strengthen the final chair, so no worries.
  • When the chair has cooled, take wool roving and cover it.  Meanwhile, put some dish detergent in a pot to boil.
  • Ladle the hot, soapy water onto your chair.  When it is saturated, place it in the Ziploc with some more warm, soapy water, and gently massage the roving against the chair.  If the water cools, refresh it with warmer water from the pot.
  • When the roving has shrunk to form a nice, snug coat, take out the chair and rinse until the water runs clean.  Let dry.
  • Meanwhile, take your plastic lollipop stick and cut to length.  With a hot pin, place three equidistant holes around the circumference of the stick, just up from one end.  Enlargen the holes to just smaller than the diameter of your paperclip.


The chair and its stand.  A very small Polly
Pocket chair invaded this tutorial for no reason
  • Cut three lengths of paper clip and shape one end to curve.  Or, you could just cut the lengths from where the clip naturally curves.
  • Super glue the paperclips into the holes in the lollipop stick.
  • Move aside some wool from the bottom to super glue the lollipop stick into the pre-made indentation.
That's it.  Enjoy your chair!  See if you can beat my record of making one chair in three months.  You might want to modify the base, as it doesn't seem terribly sturdy.  I might even try this using a hot knife to cut the plastic egg directly and use that as the base.  Let me know if you try it and how it works out.  Have fun!


Sunday, March 3, 2013

My Mini Miniaturist

1 comments
Look at what Tootie Pie did!  Lighting for the bedrooms.  Sure, it's just two little flashlights suspended from the ceiling with tape, but not a bad first effort.  She is also responsible for moving the refrigerator into the children's room and the bureau drawers in front of the door. 
 
I finished the Egg chair.  It is a bit crooked.  Tutorial to follow.  I have also been working on setting up my tutorials on Pinterest, and trying to scan my logo so that it's clearer.  As you can see, I have NOT improved the header on the blog.  I am also trying new linens for the master bedroom.  I still can't find a fabric that I'm happy with.  Even a scan of the wallpaper doesn't match the wallpaper (?!).  Should I add an accent color, such as orange?


The Hard Way Copyright © 2012 Design by Ipietoon Blogger Template

Blogging tips